
|
Teachers can send the Teacher PC's screen to the student PCs for demonstrations or presentations.
 Click Stop
During the full screen demo, the student computer's keyboard and mouse is locked. |
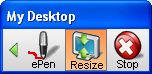
On the teacher screen during the
Send Demo function, a subfunction menu will appear. You can execute the following
functions during screen demo.

| Subfunctions | Description |
|---|---|
| Mic | Send a teacher's microphone voice to the students |
ePen |
Start the ePen annotation tool >>> How to use the ePen Annotation Tool |
Window |
Reduces the demo screen size to a smaller window size. Students can then regain access to their keyboards and mice to follow along with the teacher screen demo. |
Resize |
If the teacher's screen resolution is larger than the student's screen resolution, it will be automatically adjust to the student's screen size. |
| Pause | Pause/freeze the teacher demo on the student's screen |
| Record | Start and stop recording the teacher demo and save as a video file. |
| Stop | Stop sending the screen demo |
You can show the teacher's PC screen to the entire class or selected students. You can also use the ePen tool to write (annotate) on the top of any desktop you're showing and students will be able to see your annotations on their own monitors as well.
 Click ePen
>>
Click ePen
>> 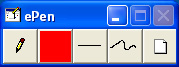
| ePen functions | Description |
|---|---|
Start
and Stop Drawing |
Click to start drawing on the desktop. Click again to stop drawing. |
Pen
Color |
Changes the pen color |
Boldness |
Changes the boldness/thickness of the line |
Changes
the drawing tool 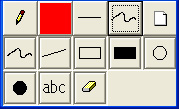 |
Changes the drawing tool from Line, Scribble, Rectangle, Circle, Alpha Character and Eraser. |
Clear |
Clears all drawings |
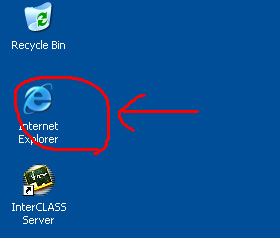
You can select one student and start remote controlling them from the teacher computer.
 Double-click
the student icon
Double-click
the student icon
On the teacher screen, a subfunction
menu will appear. You can execute the following functions during the monitor:
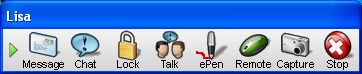
| Sub Functions | Description |
|---|---|
Message |
Sends a message to a student |
Chat |
Text chat with a student |
Lock |
Locks a student computer |
| Conversation | Conversation with a student (Headset required) |
| ePen | Starts the ePen >>How to use the ePen Annotation Tool |
| Remote | Starts remote controlling a student's mouse and keyboard |
| Capture | Takes a student's desktop screen shot |
| Stop | Stops the fullscreen monitor |
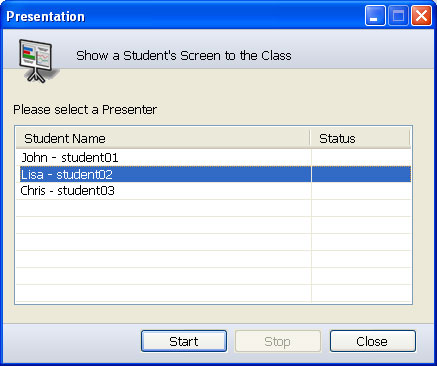


Please
note that at least 2 students must be logged into InterCLASS for the
Student Presentation function to work. |
- Other
student computers are locked during a student's presentation. |
On the teacher screen, the student
presentation subfunction menu will appear. You can execute the following functions
during student presentation.
| Sub Functions | Description |
|---|---|
ePen |
Starts the ePen on the student computer and lets the student annotate their presentation. |
Resize |
If the presenting student's screen resolution is larger than the rest of the student PCs, it will automatically adjust to fit the other student PCs' screen size. |
| Remote | Start remote controlling the presenting student's computer. |
| Stop | Stop the student presentation. |

